Using Python for Encryption

Cryptography can be defined as the practice of hiding information and includes techniques for message-integrity checking, sender/receiver identity authentication, and digital signatures. The following are the four most common types of cryptography algorithms:
- Hash functions: Also known as a one-way encryption, these have no key. A
hashfunction outputs a fixed-length hash value for plaintext input, and in theory, it's impossible to recover the length or content of the plaintext. One-waycryptographicfunctions are used in websites to store passwords in a manner they cannot be retrieved - Keyed hash functions: Used to build message-authentication codes (MACs); MACs are intended to prevent brute-force attacks. So, they are intentionally designed to be slow.
- Symmetric encryption: Output a ciphertext for some text input using a variable key, and you can decrypt the ciphertext using the same key. Algorithms that use the same key for both encryption and decryption are known as symmetric key algorithms.
- Public key algorithms: For public key algorithms, there are two different keys: one for encryption and the other for decryption. Users of this technology publish their public keywhile keeping their private key secret. This enables anyone to send them a message encrypted with the public key, which only the holder of the private key can decrypt. These algorithms are designed to make the search for the private key extremely difficult, even if the corresponding public key is known to an attacker.
For example, for hash functions, Python provides some modules, such as hashlib. The following script returns the md5 checksum of the file. The code for this article is available at here.
You can find the following code in the md5.py file in the hashlib folder in the repository:
import hashlib

def md5Checksum(filePath):
   fh = open(filePath, 'rb')
   m = hashlib.md5()
   while True:
       data = fh.read(8192)
       if not data:
           break
       m.update(data)
   return m.hexdigest()

print('The MD5 checksum is', md5Checksum('md5.py'))
The output of this script will be as follows:
The MD5 checksum is 8eec2037fe92612b9a141a45b60bec26
Encrypting and decrypting information with pycrypto
When it comes to encrypting information with Python, one of the most reliable ones is the PyCrypto cryptographic library, which supports functions for block-encryption, flow-encryption, and hash-calculation.
The PyCrypto module provides all the necessary functions for implementing strong cryptography in a Python program, including both hash functions and encryption algorithms. For example, the block ciphers supported by pycrypto are:
- AES
- ARC2
- Blowfish
- CAST
- DES
- DES3
- IDEA
- RC5
In general, all these ciphers are used in the same way. You can use the Crypto.Cipher package to import a specific cipher type:
from Crypto.Cipher import [Cipher_Type]
You can use the new method constructor to initialize the cipher:
new ([key], [mode], [Vector IV])
With this method, only the key is mandatory, and you must take into account whether the type of encryption requires that it has a specific size. The possible modes are MODE_ECB, MODE_CBC, MODE_CFB, MODE_PGP, MODE_OFB, MODE_CTR, and MODE_OPENPGP.
If the MODE_CBC or MODE_CFB modes are used, the third parameter (Vector IV) must be initialized, which allows an initial value to be given to the cipher. Some ciphers may have optional parameters, such as AES, which can specify the block and key size with the block_size and key_size parameters.
In the same way as the hashlib, hash functions are also supported by pycrypto. The use of general hash functions with pycrypto is similar:
- Use the
Crypto.Hashpackage to import a specific hash type:from Crypto.Hash import [Hash Type] - Use the update method to set the datayouneedtoobtain the hash:
update('data') - Use the
hexdigest()method to generate the hash:hexdigest()
The following is the same example that you saw for obtaining the checksum of a file, in this case,you are using pycrypt instead of hashlib. You can find the following code in the hash.py file in the pycrypto folder:
from Crypto.Hash import MD5

def md5Checksum(filePath):
   fh = open(filePath, 'rb')
   m = MD5.new()
   while True:
       data = fh.read(8192)
       if not data:
           break
       m.update(data)
   return m.hexdigest()

print('The MD5 checksum is' + md5Checksum('hash.py'))
To encrypt and decrypt data, you can use the encrypt and decrypt functions:
encrypt ('clear text')
decrypt ('encrypted text')
Encrypting and decrypting with the DES algorithm
DES is a block cipher, which means that the text to be encrypted is a multiple of eight, so you added spaces at the end of the text. When you decipher it, you remove it.
The following script encrypts a user and a password and, finally, simulating that it is the server that has received these credentials, decrypts, and displays this data.
You can find the following code in the Encrypt_decrypt_DES.py file in the pycrypto folder:
from Crypto.Cipher import DES

# How we use DES, the blocks are 8 characters
# Fill with spaces the user until 8 characters
user =  "user    "
password = "password"

# we create the cipher with DES
cipher = DES.new('mycipher')

# encrypt username and password
cipher_user = cipher.encrypt(user)
cipher_password = cipher.encrypt(password)

# we send credentials
print("User: " + cipher_user)
print("Password: " + cipher_password)
# We simulate the server where the messages arrive encrypted.

# we decode messages and remove spaces with strip()
cipher = DES.new('mycipher')
decipher_user = cipher.decrypt(cipher_user).strip()
decipher_password = cipher.decrypt(cipher_password)
print("SERVER decipher:")
print("User: " + decipher_user)
print("Password: " + decipher_password)
The program encrypts the data using DES, so the first thing it does is import the DES module and create an encoder with the following instruction:
cipher = DES.new('mycipher')
The ‘mycipher’ parameter value is the encryption key. Once the cipher is created, encryption and decryption is quite simple.
Encrypting and decrypting with the AES algorithm
AES encryption needs a strong key. The stronger the key, the stronger your encryption. Your Initialization Vector needs to be 16 Bytes long. This will be generated using the random and string modules.
To use an encryption algorithm such as AES, you can import it from the Crypto.Cipher.AES package. As the PyCrypto block-level encryption API is very low level, it only accepts 16-, 24-, or 32-bytes-long keys for AES-128, AES-196, and AES-256, respectively.
Also, for AES encryption using pycrypto, you need to ensure that the data is a multiple of 16 bytes in length. Pad the buffer if it is not and include the size of the data at the beginning of the output, so the receiver can decrypt it properly.
You can find the following code in the Encrypt_decrypt_AES.py file in the pycrypto folder:
# AES pycrypto package
from Crypto.Cipher import AES

# key has to be 16, 24 or 32 bytes long
encrypt_AES = AES.new('secret-key-12345', AES.MODE_CBC, 'This is an IV-12')

# Fill with spaces the user until 32 characters
message = "This is the secret message      "

ciphertext = encrypt_AES.encrypt(message)
print("Cipher text: " , ciphertext)

# key must be identical
decrypt_AES = AES.new('secret-key-12345', AES.MODE_CBC, 'This is an IV-12')
message_decrypted = decrypt_AES.decrypt(ciphertext)

print("Decrypted text: ", message_decrypted.strip())
The output of the previous script will be as follows:
('Cipher text: ', '\xf2\xda\x92:\xc0\xb8\xd8PX\xc1\x07\xc2\xad"\xe4\x12\x16\x1e)(\xf4\xae\xdeW\xaf_\x9d\xbd\xf4\xc3\x87\xc4')('Decrypted text: ', 'This is the secret message')
File encryption with AES
AES encryption requires that each block being written be a multiple of 16 bytes in size. So, you read, encrypt, and write the data in chunks. The chunk size is required to be a multiple of 16. The following script encrypts the file provided by the parameter. You can find the following code in the aes-file-encrypt.py file in the pycrypto folder:
from Crypto.Cipher import AES
from Crypto.Hash import SHA256
import os, random, struct

def encrypt_file(key, filename):
   chunk_size = 64*1024
   output_filename = filename + '.encrypted'

   # Initialization vector
   iv = ''.join(chr(random.randint(0, 0xFF)) for i in range(16))

   #create the encryption cipher
   encryptor = AES.new(key, AES.MODE_CBC, iv)

   #Determine the size of the file
   filesize = os.path.getsize(filename)

   #Open the output file and write the size of the file.
   #We use the struct package for the purpose.
   with open(filename, 'rb') as inputfile:
       with open(output_filename, 'wb') as outputfile:
           outputfile.write(struct.pack('<Q', filesize))
           outputfile.write(iv)

           while True:
               chunk = inputfile.read(chunk_size)
               if len(chunk) == 0:
                   break
               elif len(chunk) % 16 != 0:
                   chunk += ' ' * (16 - len(chunk) % 16)
               outputfile.write(encryptor.encrypt(chunk))

password = "password"

def getKey(password):
   hasher = SHA256.new(password)
   return hasher.digest()

encrypt_file(getKey(password), 'file.txt');
The output of the previous script is a file called file.txt.encrypted, which contains the same content of the original file but the information is not legible. The previous script works in the way that first, you load all required modules and define the function to encrypt the file:
from Crypto.Cipher import AES
import os, random, struct
def encrypt_file(key, filename, chunk_size=64*1024):
output_filename = filename + '.encrypted'
Also, you need to obtain your Initialization Vector. A 16-byte initialization vector is required, which is generated as follows:
# Initialization vector
iv = ''.join(chr(random.randint(0, 0xFF)) for i in range(16))
Then, you can initialize the AES encryption method in the PyCrypto module:
encryptor = AES.new(key, AES.MODE_CBC, iv)
filesize = os.path.getsize(filename)
File decryption with AES
For decrypting, you need to reverse the preceding process using AES. You can find the following code in the aes-file-decrypt.py file in the pycrypto folder:
from Crypto.Cipher import AES
from Crypto.Hash import SHA256
import os, random, struct

def decrypt_file(key, filename):
   chunk_size = 64*1024
   output_filename = os.path.splitext(filename)[0]

   #open the encrypted file and read the file size and the initialization vector.
   #The IV is required for creating the cipher.
   with open(filename, 'rb') as infile:
       origsize = struct.unpack('<Q', infile.read(struct.calcsize('Q')))[0]
       iv = infile.read(16)

       #create the cipher using the key and the IV.
       decryptor = AES.new(key, AES.MODE_CBC, iv)

       #We also write the decrypted data to a verification file,
       #so we can check the results of the encryption
       #and decryption by comparing with the original file.
       with open(output_filename, 'wb') as outfile:
           while True:
               chunk = infile.read(chunk_size)
               if len(chunk) == 0:
                   break
               outfile.write(decryptor.decrypt(chunk))
           outfile.truncate(origsize)

password = "password"

def getKey(password):
   hasher = SHA256.new(password)
   return hasher.digest()

decrypt_file(getKey(password), 'file.txt.encrypted');
Encrypting and decrypting information with cryptography
Cryptography is a module more recent and it has better performance and security than pycrypto.
Introduction to cryptography
Cryptography is available in the pypi repository and you can install with the pip install cryptography command.
Cryptography includes both high-level and low-level interfaces to common cryptographic algorithms, such as symmetric ciphers, message digests, and key-derivation functions. For example, you can use symmetric encryption with the fernet package.
Symmetric encryption with the fernet package
Fernet is an implementation of symmetric encryption and guarantees that an encrypted message cannot be manipulated or read without the key. For generating the key, you can use the generate_key() method from the Fernet interface.
The following code is saved in the encrypt_decrypt.py file in the cryptography folder:
from cryptography.fernet import Fernet

key = Fernet.generate_key()
cipher_suite = Fernet(key)

print("Key "+str(cipher_suite))
message = "Secret message"

cipher_text = cipher_suite.encrypt(message)
plain_text = cipher_suite.decrypt(cipher_text)

print("\n\nCipher text: "+cipher_text)

print("\n\nPlain text: "+plain_text)
This is the output of the script: 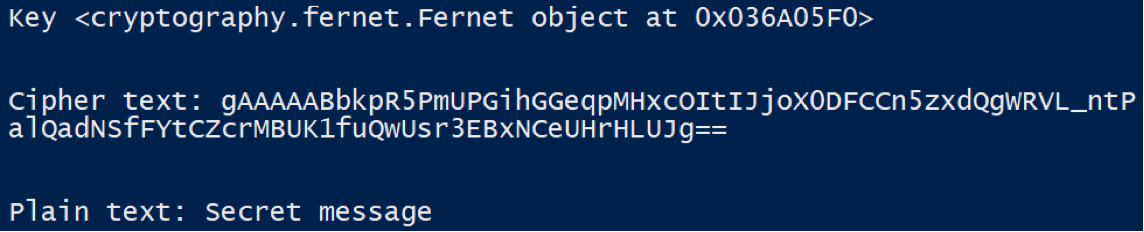
Using passwords with the fernet package
It is possible to use passwords with Fernet. To do this, you need to run the password through a key-derivation function, such as PBKDF2HMAC. PBKDF2 (Password Based Key Derivation Function 2) is typically used for deriving a cryptographic key from a password.
In this example, you’ll this function to generate a key from a password and use that key to create the Fernet object for encrypting and decrypting data. In this case, the data to encrypt is a simple message string. You can use the verify() method, which checks whether deriving a new key from the supplied key generates the same key as the expected key.
You can find the following code in the encrypt_decrypt_kdf.py file in the cryptography folder:
import base64
import os
from cryptography.fernet import Fernet
from cryptography.hazmat.backends import default_backend
from cryptography.hazmat.primitives import hashes
from cryptography.hazmat.primitives.kdf.pbkdf2 import PBKDF2HMAC

password = "password"
salt = os.urandom(16)
kdf = PBKDF2HMAC(algorithm=hashes.SHA256(),length=32,salt=salt,iterations=100000,backend=default_backend())

key = kdf.derive(password)

kdf = PBKDF2HMAC(algorithm=hashes.SHA256(),length=32,salt=salt,iterations=100000,backend=default_backend())

#verify() method checks whether deriving a new key from
#the supplied key generates the same key as the expected_key,
#and raises an exception if they do not match.
kdf.verify(password, key)

key = base64.urlsafe_b64encode(key)
fernet = Fernet(key)
token = fernet.encrypt("Secret message")

print("Token: "+token)
print("Message: "+fernet.decrypt(token))
This is the output of the script:

If you verify the key with the verify() method, and it checks that keys do not match during the process, it launches the cryptography.exceptions.InvalidKey exception:

Symmetric encryption with the ciphers package
The ciphers package from the cryptography module provides a class for symmetric encryption with the cryptography.hazmat.primitives.ciphers.Cipher class.
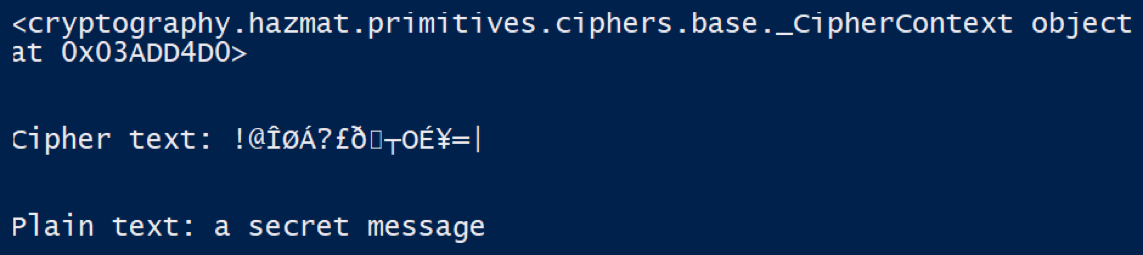
Cipher objects combine an algorithm, such as AES, with a mode, such as CBC or CTR. In the following script, you can see an example of encrypting and decrypting content with AES. You can find the code in the encrypt_decrypt_AES.py file in the cryptography folder:
import os
from cryptography.hazmat.primitives.ciphers import Cipher, algorithms, modes
from cryptography.hazmat.backends import default_backend

backend = default_backend()
key = os.urandom(32)
iv = os.urandom(16)
cipher = Cipher(algorithms.AES(key), modes.CBC(iv), backend=backend)

encryptor = cipher.encryptor()
print(encryptor)

message_encrypted = encryptor.update("a secret message")

print("\n\nCipher text: "+message_encrypted)
ct = message_encrypted + encryptor.finalize()

decryptor = cipher.decryptor()

print("\n\nPlain text: "+decryptor.update(ct))
This is the output of the previous script:
 If you found this article interesting, you can explore José Manuel Ortega’s Mastering Python for Networking and Security to build a network and perform security operations. Mastering Python for Networking and Security will help you get the most out of the Python language to build secure and robust networks that are resilient to attacks.