How to Interact with Blockchain

Blockchain as technology has evolved rapidly, as new techniques deriving from the proliferation of blockchain projects have emerged. Hence the attempts to understand the present day blockchain machinery more closely led to the discovery of bitcoin.
Therefore, in this article, we will adopt bitcoin as our main example. This choice is due to the fact that bitcoin is the original blockchain implementation, and almost all other projects mimic its design and mechanics.
In the following sections, we will connect to the bitcoin network and store the classic Hello World message into a blockchain. Bitcoin transactions can be used to store small amounts of data in a blockchain—allowing developers to build distributed systems on top of bitcoin, such as Colored Coins, Counterparty, Tierion, and more.
You would be surprised by the number of hidden messages stored in the bitcoin blockchain.
Getting started
In order to store our message into a blockchain, we will set up two bitcoin clients (a receiver and a sender). Then, we will build a raw transaction, sending one bitcoin along with our message.
Technically speaking, one of the best-known practices for storing data in the bitcoin blockchain is to create a zero-value OP_RETURN output. As defined in bitcoin's protocol, the OP_RETURN script opcode enables us to store up to 80 bytes. You can check it out in bitcoin's code base—cript/standard.h (see https://github.com/bitcoin/bitcoin/blob/0.15/src/script/standard.h):
static const unsigned int MAX_OP_RETURN_RELAY = 83;
As mentioned in the cript/standard.h header file, the three additional bytes are for the necessary opcodes, and the remainder is for the extra message. More importantly, the OP_RETURN output can be pruned, helping to avoid bloating the blockchain in the future.
We will achieve our goal by creating a raw transaction with an OP_RETURN output, using RPC commands and a bitcoin client.
Running a bitcoin client for the first time
A bitcoin client is an end-user software that allows us to perform bitcoin operations (sending transactions, receiving payments, and so on). When you run one, you become part of the bitcoin network. We have chosen two common clients: Bitcoin Core and Electrum. In our example, the sender will use Electrum and the receiver will use Bitcoin Core (the most popular bitcoin client).
For the purposes of this demonstration, I will install them on a single machine using Ubuntu 16.04. You can install Bitcoin Core (version 15.04) using the following commands:
wget https://bitcoincore.org/bin/bitcoin-core-0.15.2/bitcoin-0.15.2-x86_64-linux-gnu.tar.gz
sudo install -m 0755 -o root -g root -t /usr/local/bin bitcoin-0.15.2/bin/*
Electrum is a lightweight wallet, which means it doesn't require you to download the entire blockchain. Download and install the latest version of Electrum as follows:
wget https://download.electrum.org/3.2.2/Electrum-3.2.2.tar.gz
sudo apt-get install python3-setuptools python3-pyqt5 python3-pip
sudo pip3 install Electrum-3.2.2.tar.gz
Once both clients are installed, synchronize them with the network.
Synchronizing the blockchain
A blockchain is a transaction database duplicated by all computers on the network. We need to sync a huge amount of data (>200 GB) to enable the sending or receiving of bitcoins. However, there are two workarounds to this:
- Enabling pruning for a full-node client such as Bitcoin Core
- Using a thin (SPV) client such as Electrum, which fetches blockchain information from Electrum servers instead of having a local copy
We will look at both solutions. Nonetheless, it's always advisable to use a bitcoin full-node client to benefit from the power of blockchain.
Running Bitcoin Core
Depending on your OS, you need to create the bitcoin.conf configuration file in the default data directory located under the following paths:
- Windows: %APPDATA%\Bitcoin\
- Mac: $HOME/Library/Application Support/Bitcoin/
- Linux: $HOME/.bitcoin/
In Linux, create a .bitcoin directory using mkdir ~/.bitcoin, then create the bitcoin.conf file using nano ~/.bitcoin/bitcoin.conf. Add the following lines to bitcoin.conf to define your client configuration (the comments after each # sign explain the parameters):
rpcuser=user_name            #Username for JSON-RPC connections
rpcpassword=your_password    #Password Username for JSON-RPC connections
server=1                     #Tells Bitcoin-Qt and bitcoind to accept JSON-RPC commands
testnet=1                    #Run on the test network instead of the real bitcoin network.
prune=550                    #Enables pruning mode
Once copied, press Ctrl + X, then Y, and then Enter to save the file.
Now, our first client is ready to run on the testnet, which is a bitcoin network created for testing purposes that follows the same rules as the main network. It's a public network using worthless bitcoins. You can use this network to send free transactions and test your applications.
It's now time to run Bitcoin Core. Open a new command line interface (CLI) window, and run the following command:
bitcoin-qt
Bitcoin Core will start running with its standard GUI interface connected to the testnet.
For the first run, it will ask you to set the data directory, which we will set to the default. It will then automatically create a wallet for you, start syncing with the testnet, and download the blockchain:

Alternatively, you could run the bitcoin daemon in CLI mode with the following command:
bitcoind
It's up to you to choose which mode to continue using (bitcoind or bitcoin-qt); the available RPC commands are the same. For my part, I'll continue this guide using btcoin-qt. As Bitcoin Core starts up, it creates many subdirectories and files in the default data directory (.bitcoin), as shown in the following screenshot:

The main subdirectories are:
blocks: Stores actual bitcoin blockschainstate: Holds a LevelDB database for available UTXOs (short for Unspent Transaction Outputs)—in other words, a database storing how much money everyone haswallet: Contains an encrypted wallet.dat file, which stores the private keys
Even if the network sync is not yet finished, you can open the blocks/ subdirectory to see the blockchain's blocks stored in raw format. Each blk00*.dat file is a collection of several raw blocks:

While the server (bitcoind or bitcoin-qt) is running, open another Terminal. Let's generate a new address for our wallet by executing bitcoin-cli getnewaddress, as in the following screenshot:

Basically, bitcoin-cli is a tool that enables us to issue RPC commands to bitcoind or bitcoin-qt from the command line (bitcoin-qt users can also access the bitcoin RPC interface by using the Debug console, under the Help menu).
Now we have finished with Bitcoin Core, let's leave it to sync with the blockchain and move on to configuring Electrum.
Running Electrum
After you have downloaded and installed Electrum, open Electrum's testnet mode by running electrum --testnet. When you run Electrum for the first time, it will display the new wallet creation wizard. Follow these steps:
- Select
Auto Connectin the first dialog box and clickNext. - Select
Standard walletand clickNext. - Keep selecting
Nextfor each dialog box that appears, until you are asked to save your seed words. Copy them, then reconfirm that you've saved them correctly, as follows:
- In the last step, it will ask you for a password, which you can leave empty.
- Once finished, Electrum will generate a new wallet with plenty of new addresses. Quit the Electrum GUI, and let's continue in CLI mode. We run Electrum as a daemon process, whereby we execute the JSON/RPC commands as follows:
electrum --testnet daemon
electrum --testnet daemon load_wallet
- In a new Terminal window, run electrum --testnet listaddresses:
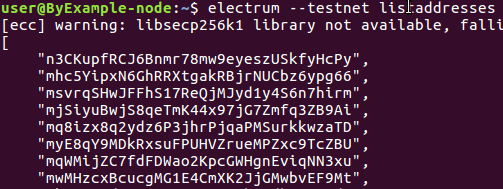
Great, now we have the necessary environment to start transacting with the public bitcoin network. That said, let's discover how a bitcoin transaction is created, exchanged and stored in the blockchain by constructing a bitcoin raw transaction, signing it, and broadcasting it to the network.
Building a raw transaction using Bitcoin Core
For the sake of brevity, we'll focus herein on the instructions needed to create and send raw transactions in Bitcoin Core, without lengthy explanations.
Funding our address
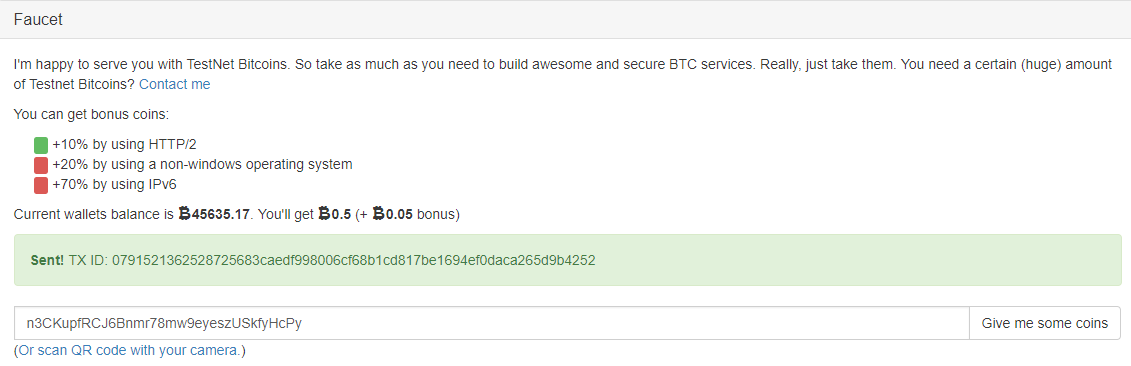
First off, we need to fund our previously created address with some bitcoins in order to make the first transaction. Thankfully, in the testnet we can use a free funding source called a bitcoin faucet, which provides worthless bitcoins for testing applications.
For this example, browse to the online faucet website at http://bitcoinfaucet.uo1.net/ or any other bitcoin's faucet websites, and get a few by providing the first address generated by Electrum and the address created by Bitcoin Core, as shown in the following screenshot:
Unspent transaction output
Now that we've sent the bitcoins from the faucet, let's check whether Bitcoin Core can see the transaction. To do that, we'll need to list the available UTXOs in both clients, using the listunspent RPC command.With Bitcoin Core running, run the following command in your Terminal window:
bitcoin-cli listunspent
This will return the following result:
[{ }]
Initially, listunpsnet returns an empty result, because Bitcoin Core hasn't yet finished syncing the blockchain, which takes time (a few hours). For this reason, we will use Electrum instead of Bitcoin Core for the remainder of this guide, as it avoids us waiting for hours to see the received bitcoins.
However, we will go back using Bitcoin Core from time to time, as it has a powerful command line to deal with raw transactions.
Now run the same command for Electrum, as follows:
electrum --testnet listunspent
We will get a list of available entries, such as the following:
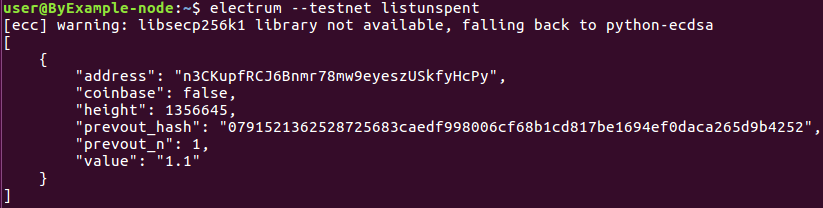
The previous command's output shows that we have a single available transaction received from the faucet, uniquely identified by its hash (prevout_hash field), with 1.1 Bitcoins.
More precisely, we have an available unspent transaction output from a previous transaction, which can be used as an input for the transaction we are willing to build, as follows:
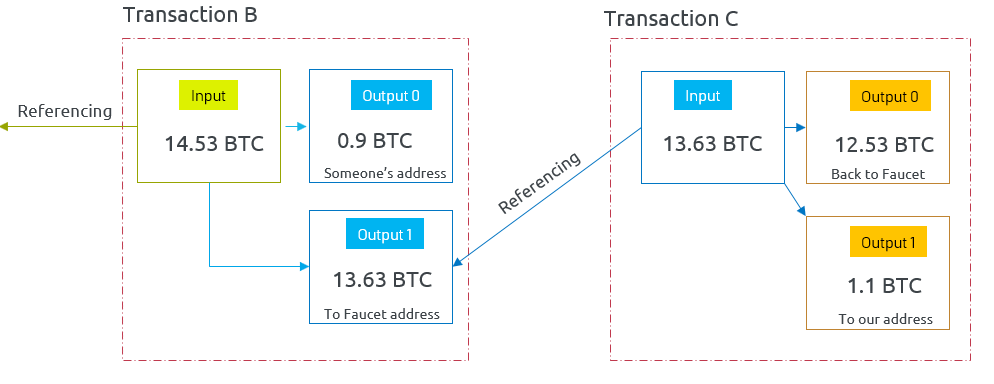
In Bitcoin, transactions spend outputs from prior transactions and generate new outputs that can be spent by transactions in the future. In fact, users move funds solely by spending UTXOs.
The previous diagram shows that the transaction (Transaction C) we received from the faucet consumes as inputs an existing output (output 1) created earlier by an old transaction. The same transaction creates two outputs: one for us (output 1), and the other returns back the change (output 0). The reason for this is that transaction outputs must be fully spent.
Unlike what you might have expected, in bitcoin, transactions don't update a global user balance (the account/balance model). Instead, they move bitcoins between one or more inputs and outputs (the UTXO model). The total balance is calculated by the bitcoin client as the sum of the values transferred by the received unspent transactions.
Creating the transaction
At this level, it's time to create a transaction that spends the received transaction. From the listunspent output, we have the necessary ingredients (prevout_hash and prevout_n) to construct our raw transaction.
First, you need to convert the hello world message into hexadecimal, using an online converter (such as https://codebeautify.org/string-hex-converter). The hexadecimal encoded form will be 68656c6c6f20776f726c64.
Then we have to use the createrawtransaction command, which creates a transaction spending the given inputs and creating new outputs. We have to pass as an argument (from the previous output) an object with the following parameters:
- The
txidof one of the available outputs - The
voutindex (prevout_n for Electrum) of the selected output - The hexadecimal form of the message
- The destination address (created earlier)
- The total number of satoshis (the smallest unit of the bitcoin currency) to send
Here we are sending one bitcoin, although you can set it to 0:
bitcoin-cli createrawtransaction "[{\"txid\":\"0791521362528725683caedf998006cf68b1cd817be1694ef0daca265d9b4252\", \"vout\": 1}]" "{\"data\":\"68656c6c6f20776f726c64\",\"2MsHsi4CHXsaNZSq5krnrpP4WShNgtuRa9U\":1.0000000}"
You'll get the following serialized long hex-encoded string, representing our raw transaction:
020000000152429b5d26cadaf04e69e17b81cdb168cf068099dfae3c6825875262135291070100000000ffffffff0200000000000000000d6a0b68656c6c6f20776f726c6400e1f5050000000017a914008051b4d96aa26269dfd36af0eb9c2b2fa894568700000000
Transaction structure
At first sight, the previous resultant hexadecimal string seems ambiguous and meaningless. The following table breaks down and examines in depth our transaction, byte by byte:
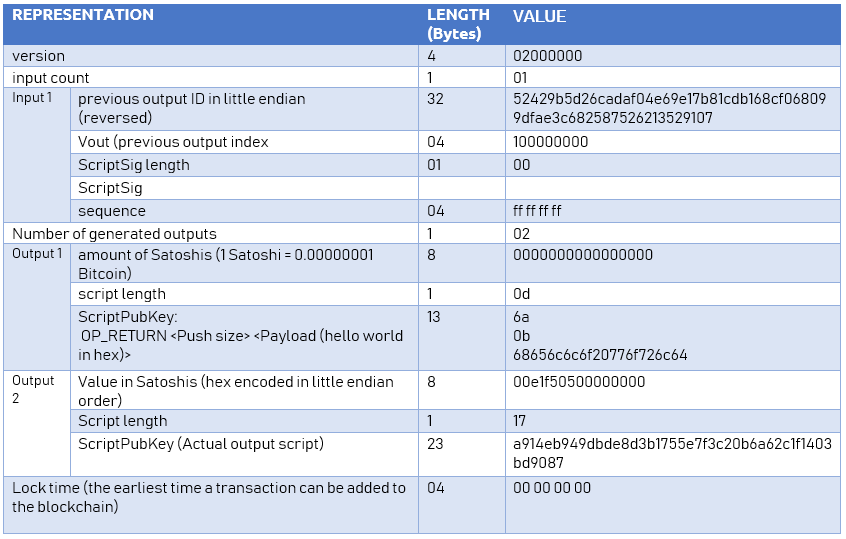
As you can see, our transaction has one input (the only unspent transaction received from the faucet), with the 0791...252 transaction id, and two outputs:
- An
OP_RETURNoutput with anOP_RETURNscript - An output sending one bitcoin to the specified address
The transaction structure can be visualized by decoding back the raw transaction using the deserialize command. If you run electrum --testnet deserialize <Raw transactions>, it will output a meaningful JSON representation of our constructed transaction:
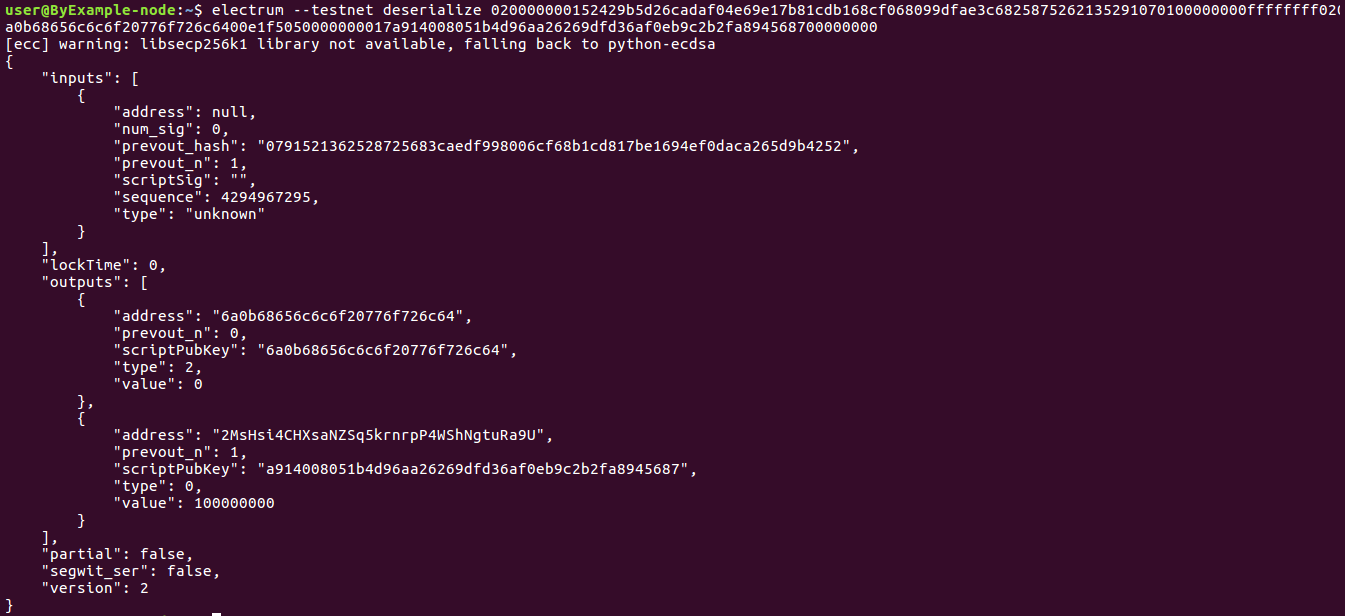
To get the same result, you can decode the raw transaction using bitcoin-cli decoderawtransaction, or using an online decoder such as the one at https://live.blockcypher.com/btc-testnet/decodetx/.
Signing the transaction
At this point, the transaction is created, but not yet transmitted to the network. To send our transaction, we need to sign it using the bitcoin-cli signrawtransaction command. We sign the transaction using our private key (related to the receiving address) to prove to the network our ownership of the output, and therefore our authority to spend the held bitcoins.
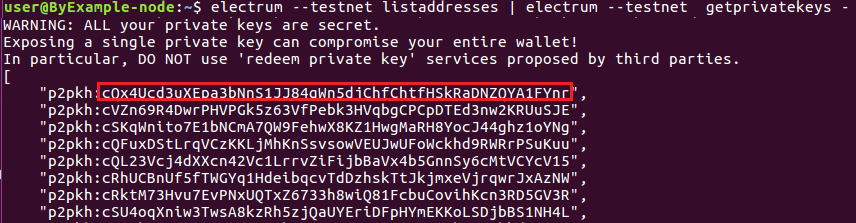
The first step will be to extract the private key associated with the first address used to receive the bitcoins from the faucet:
electrum --testnet listaddresses | electrum --testnet getprivatekeys -
Notice the presence of a dash at the end of the command. It will be replaced by the values returned from the pipe. As a result, you'll get a list of private keys. Copy the first one without the p2pkh prefix, as follows:
Next, we need to get scriptPubKey from the output we are willing to spend. For that, firstly, we have to retrieve the transaction from the blockchain, using electrum gettransaction --testnet "0791521362528725683caedf998006cf68b1cd817be1694ef0daca265d9b4252".
Secondly, we use the resultant raw form to get scriptPubKey, as follows:
electrum deserialize --testnet 0200000001915bf222c2e4e6ff36760168904ae102a0e968d83b3c575077d5475aa94dd9bf010000006b483045022100b129bc0fb5631aa668c48bb7a8fef0c81fec131d2f68ba430cd7cd9de0bd971b02203dabbf054790e31b4fd1b9a333881cd480c19b38a229e70f886dbb88ee4673f1012103bcf53d63d2fa14ee04d9ebb9170dfa7987298689c7e6ceb765c1d3ccd7f9ad01feffffff02d618b24a000000001976a914b9172e192d2805ea52fa975847eea0657e38fef888ac80778e06000000001976a914edcce89f510bf95606ec6a79cb28a745c039e22088ac63b31400
Unlike before, here we are loading and deserializing the received transaction from the faucet. We will get the outputs created in this transaction, as follows:
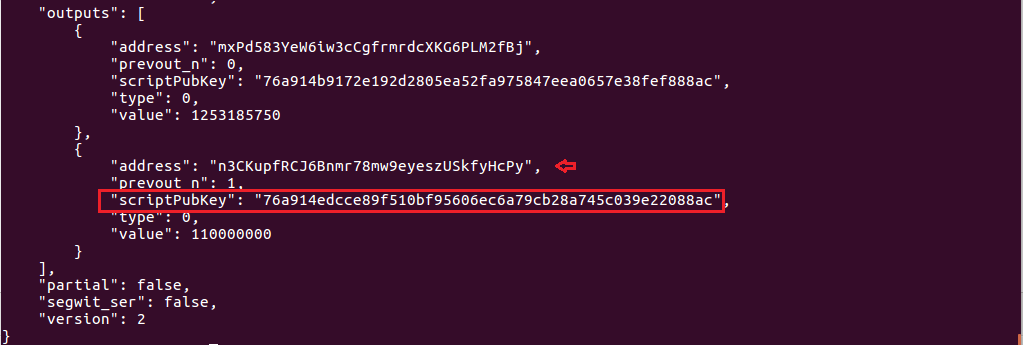
The part surrounded in red is scriptPubKey of the unspent transaction output.
A scriptPubKey can be seen in the outputs; it represents the conditions that are set for spending the outputs. The new owner can sign using the private key associated with the address receiving the output to fulfill the conditions of scriptPubKey.
The network checks whether the digital signature is valid, and if so, makes it input for the new transaction. Copy scriptPubKey from the output, and pass it along the other options to the signrawtransaction command, as follows:
signrawtransaction "Raw hexstring" ( [{"txid":"id","vout":n,"scriptPubKey":"hex","redeemScript":"hex"},..] ["privatekey",..])
The second argument is a JSON array of the previous transaction outputs we are consuming, and the third argument is the private key belonging to the address that received the output. The result will be similar to the following output:

After succeeding in signing the raw transaction, it is time to send the signed transaction to the testnet.
Sending the transaction
To send the transaction into a blockchain, we submit the signed signature using the broadcast command provided by Electrum, as shown in the following screenshot:

You'll get back the hex-encoded transaction hash ID:
d3e300c2f2eedf673ab544f4c2b09063353e618ab8a0c9444e931d0145e43ded
Retrieving your message online from the blockchain
If everything goes as planned, you should have successfully stored the hello world message into bitcoin's testnet blockchain.
The following screenshot illustrates what we have done so far. We consumed an input (from a previous transaction), then created a transaction with two outputs; the first being an OP_RETURN transaction carrying our message along, the other one transferring one bitcoin (BTC):
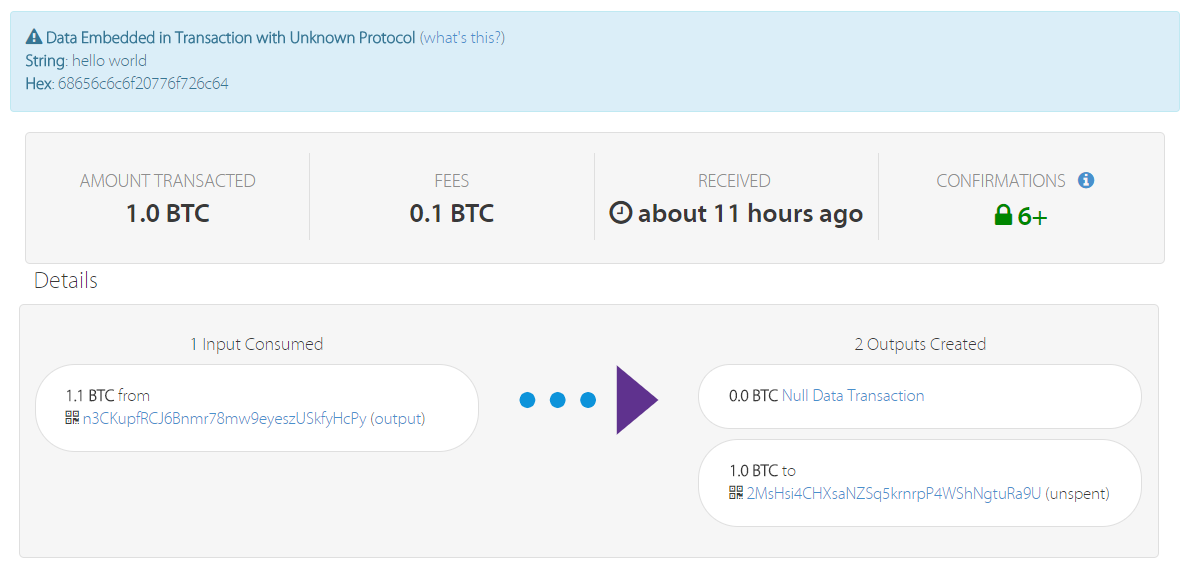
Isn't it just fascinating? You can use a block explorer such as https://live.blockcypher.com/btc-testnet/tx/<txid>; to inspect the transaction with the printed transaction hash (txid) and to retrieve your stored message.
It would be more exciting to retry the same operation using the mainnet (the original and main network for bitcoin), but then you would be dealing with real, expensive bitcoins.
Using the local blockchain
If Bitcoin Core has finished syncing the blockchain, you can locally parse the blocks to locate our transaction and read the stored message.
To open and parse the blockchain blocks, we need to install a graphical hex editor such as bless, by running sudo apt-get install bless.
Once installed, you can run it and open one of the .blk files present in the blocks directory:
As shown in the screenshot, bless will display a pane divided into three parts:
- The left column is the offset column
- The center column displays the blocks' hexadecimal content
- The right column is the same line of data as in the center, with recognized text characters displayed as text and binary values represented by period characters
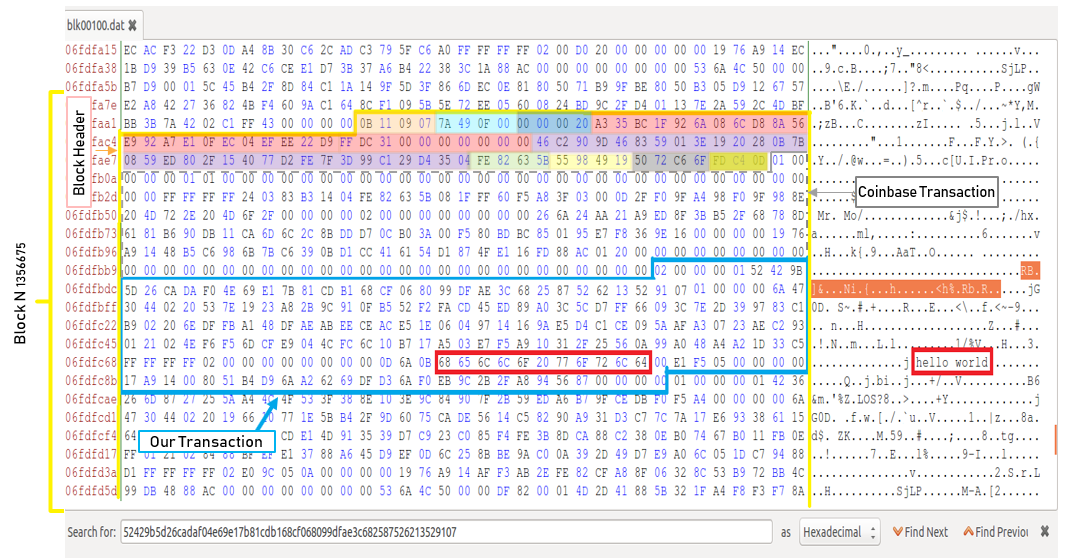
To locate our transaction, you can search for it by pasting the unsigned raw transaction string into the Search field. You may go through a few blk**.dat files before you find your transaction. In my case, I found it in the blk00100.dat file.
At first glance, it may not be very meaningful, but once you locate your transaction you can easily locate the message you’ve stored in the blockchain. The hello world message will be visible in the ASCII section on the right.
You can also locate the block that encompasses the transaction by searching for the previous block delimiter, called magic bytes, represented by 0b110907. Then you can, by following the structure of the block, determine the meaning of these long hexadecimal strings.
In the previous screenshot, I delimited the block with a yellow border and highlighted the blocks header field with multiple colors. I delimited our transaction and the coinbase transaction in blue and gray, respectively. As you'll be running in prune mode, you will not be able to see my transaction, as you will have only synced newer blocks. However, you'll be able to see your transaction by following the same process.
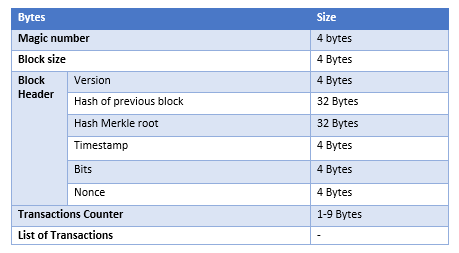
To help you visualize the block content, the following table explains the meaning of the previously highlighted bytes:
And that's it! You can now send transactions with extra messages into the blockchain and retrieve the data online or locally. Although this is not usually required, it may prove useful in the future.
As a bonus, the full code is available in the Github repository at https://github.com/bellaj/HelloWorld.
If you found this article interesting, you can explore Blockchain By Example to implement decentralized blockchain applications to build scalable apps. Blockchain By Example will walk you through the process of building multiple blockchain projects with different complexity levels and hurdles.